how to create a faux flower wall?
To create a faux flower wall, start by selecting the type and color of faux flowers you want to use. Purchase a variety of flowers in different sizes and shapes to add depth and texture to the wall. Next, decide on the size and shape of the wall you want to create. Measure the area and mark the dimensions on the wall or a large piece of plywood. Attach a sturdy backing material, such as plywood or foam board, to the wall to provide a stable surface for the flowers. Use a hot glue gun or floral adhesive to attach the faux flowers to the backing material, starting from the bottom and working your way up. Arrange the flowers in a random or patterned design, ensuring that the entire surface is covered. Once all the flowers are attached, trim any excess stems or leaves for a clean finish. Hang the faux flower wall securely on the desired location, and enjoy your beautiful and long-lasting floral display.
1、 Material Selection for Faux Flower Wall
Material Selection for Faux Flower Wall:
Creating a faux flower wall can be a beautiful and cost-effective way to add a touch of elegance to any space. When selecting materials for your faux flower wall, there are a few key factors to consider.
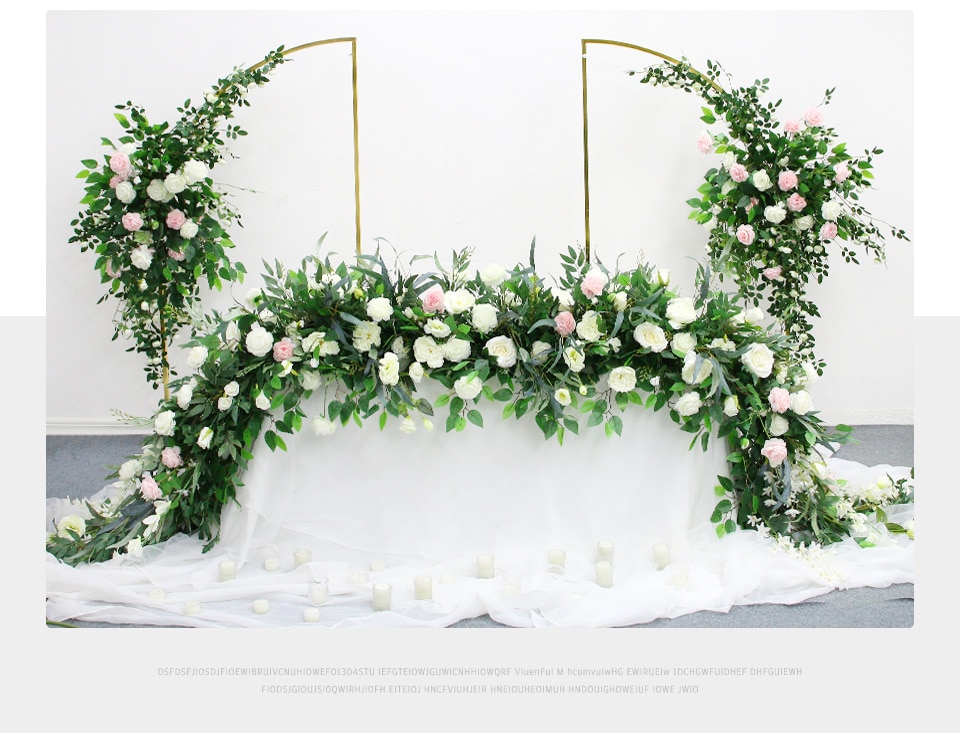
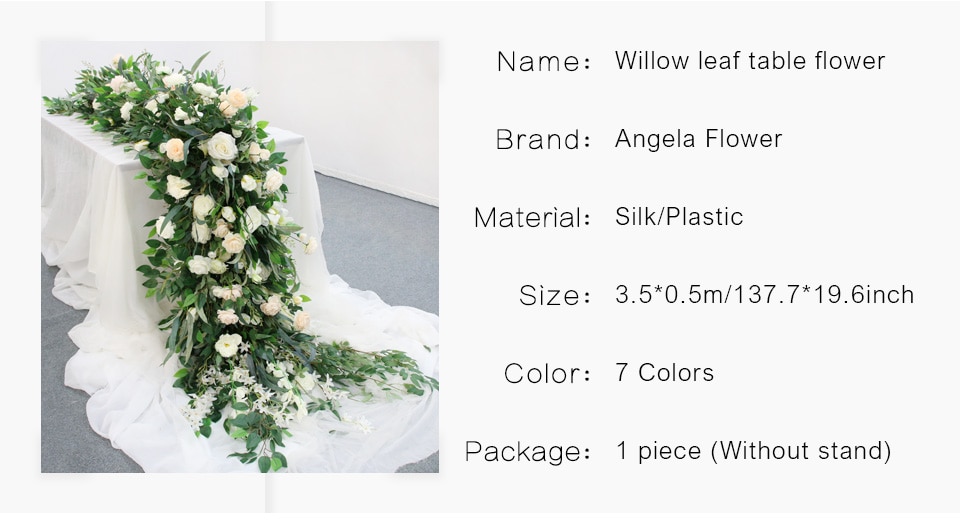
1. Faux Flowers: The most important element of a faux flower wall is, of course, the flowers themselves. When choosing faux flowers, opt for high-quality silk or fabric flowers that closely resemble real blooms. Look for flowers with vibrant colors and realistic textures to achieve a more natural look. Consider using a variety of flower types and sizes to add depth and dimension to your wall.
2. Backing Material: The backing material for your flower wall will provide the structure and support for the flowers. A popular choice is a foam board or plywood, which can be easily cut to size and mounted on a wall. Alternatively, you can use a wire mesh or chicken wire for a more flexible and customizable option.
3. Adhesive: To attach the flowers to the backing material, you will need a strong adhesive. Hot glue guns are commonly used for this purpose, as they provide a secure bond and are easy to work with. However, be cautious when using hot glue on delicate flowers, as it can cause damage. Floral adhesive or a strong craft glue can be used as an alternative.
4. Greenery and Foliage: Adding greenery and foliage to your faux flower wall can enhance its overall appearance and make it look more realistic. Consider using artificial leaves, vines, or ferns to create a lush and natural backdrop for your flowers.
5. Accessories: To complete your faux flower wall, consider adding additional accessories such as ribbons, bows, or fairy lights. These can add a touch of whimsy and create a more visually appealing display.
In conclusion, when selecting materials for a faux flower wall, it is important to choose high-quality faux flowers, a suitable backing material, a strong adhesive, and consider adding greenery and accessories to enhance the overall look. By carefully selecting these materials, you can create a stunning faux flower wall that will bring beauty and elegance to any space.
2、 Design and Layout of Faux Flower Wall
Design and Layout of Faux Flower Wall
Creating a faux flower wall can be a beautiful and eye-catching addition to any space. Whether you're looking to add a touch of elegance to a wedding or event, or simply want to enhance the aesthetic of your home, a faux flower wall can provide a stunning backdrop. Here's a step-by-step guide on how to create a faux flower wall:
1. Choose your flowers: Select a variety of faux flowers that complement your desired color scheme and overall aesthetic. Opt for high-quality silk or artificial flowers that closely resemble real blooms.
2. Prepare the base: Start by attaching a large piece of foam board or plywood to the wall where you want to create the flower wall. This will serve as the base for attaching the flowers.
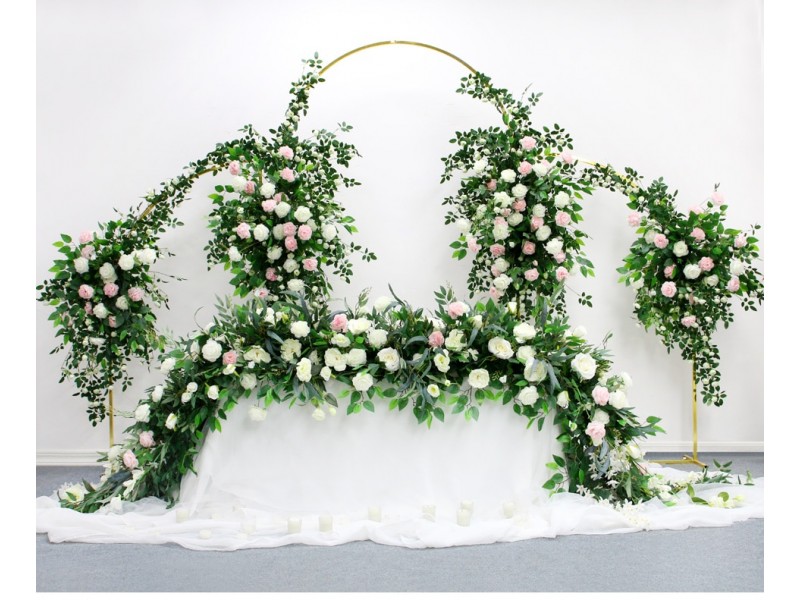
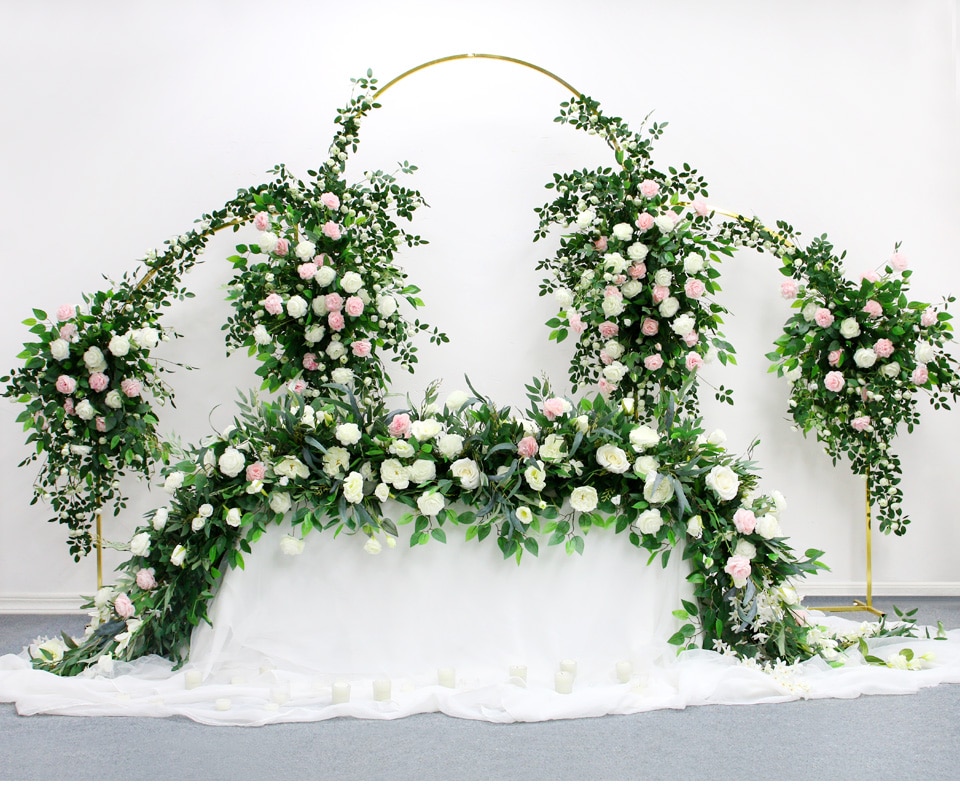
3. Arrange the flowers: Begin by laying out your flowers on the base, experimenting with different arrangements until you find the desired look. Consider mixing different types of flowers, sizes, and colors to create depth and visual interest.
4. Attach the flowers: Once you're satisfied with the arrangement, use a hot glue gun or floral adhesive to secure the flowers to the base. Start from the bottom and work your way up, ensuring that each flower is securely attached.
5. Fill in the gaps: As you attach the flowers, make sure to fill in any gaps or empty spaces with smaller flowers or foliage. This will create a more cohesive and lush appearance.
6. Hang or display: Once the flowers are securely attached, you can either hang the faux flower wall directly on the wall or prop it up against a surface. Consider using removable hooks or adhesive strips to avoid damaging the wall.
The latest trend in faux flower walls is incorporating different textures and materials, such as incorporating dried flowers, feathers, or even incorporating LED lights for a touch of sparkle. Additionally, some people are opting for more unconventional shapes and designs, such as creating a flower arch or using flowers to spell out words or initials.
Remember, the key to creating a stunning faux flower wall is to experiment with different arrangements and be creative. Let your imagination run wild and have fun with the process.
3、 Attaching Faux Flowers to the Wall
Attaching Faux Flowers to the Wall
Creating a faux flower wall is a fantastic way to add a touch of beauty and elegance to any space. Whether you're looking to spruce up your home, office, or event venue, a faux flower wall can instantly transform the ambiance. Here's a step-by-step guide on how to create your own stunning faux flower wall.
1. Choose your faux flowers: Select high-quality faux flowers that closely resemble real blooms. Opt for a variety of colors, shapes, and sizes to create a visually appealing arrangement.
2. Prepare the wall: Clean the wall surface and ensure it is smooth and free from any imperfections. If desired, you can paint the wall a complementary color to enhance the overall look.
3. Attach a backdrop: Use a large piece of fabric or a pre-made backdrop as the base for your flower wall. Secure it to the wall using removable adhesive hooks or nails.
4. Arrange the flowers: Start by trimming the stems of your faux flowers to your desired length. Begin attaching the flowers to the backdrop, starting from the bottom and working your way up. Use a hot glue gun or floral wire to secure the flowers in place.
5. Create depth and dimension: Layer the flowers, mixing different types and sizes to create depth and dimension. Consider adding greenery or foliage to fill in any gaps and create a more natural look.
6. Secure the flowers: Once you're satisfied with the arrangement, ensure that all the flowers are securely attached to the backdrop. This will prevent any accidental damage or displacement.
7. Hang and enjoy: Carefully hang your faux flower wall on the desired wall using hooks or nails. Step back and admire your beautiful creation!
Remember, faux flower walls are versatile and can be customized to suit any style or occasion. Get creative and experiment with different flower combinations to achieve the desired effect. Enjoy the beauty of your faux flower wall without the worry of wilting or maintenance, as these blooms will stay vibrant and fresh for years to come.
4、 Adding Greenery and Foliage to the Flower Wall
To create a faux flower wall, you can follow these steps:
1. Choose a suitable location: Select a wall or backdrop where you want to create your flower wall. Make sure it is a flat surface and easily accessible.
2. Measure and prepare the wall: Measure the dimensions of the wall and mark the area you want to cover with the flower wall. Clean the wall and ensure it is free from any dirt or debris.
3. Select your faux flowers: Choose a variety of faux flowers in different colors and sizes to create a visually appealing flower wall. Opt for high-quality artificial flowers that look realistic and vibrant.
4. Attach a base layer: Start by attaching a base layer to the wall using adhesive strips or hooks. This layer can be made of artificial foliage or greenery mats. It will provide a foundation for attaching the flowers and add depth to the overall look.
5. Arrange and attach the flowers: Begin arranging the faux flowers on the base layer. Start from the bottom and work your way up, ensuring that the flowers are evenly spaced and cover the entire area. Use adhesive dots or hot glue to attach the flowers securely to the base layer.
6. Adding Greenery and Foliage to the Flower Wall: To enhance the natural look of your flower wall, consider adding greenery and foliage. You can incorporate artificial leaves, vines, or ferns between the flowers. This will add texture and depth to the wall, making it more visually appealing.
7. Finishing touches: Once all the flowers and greenery are attached, step back and assess the overall look of the flower wall. Make any necessary adjustments or add additional flowers to fill in any gaps.
Remember to regularly dust and clean your faux flower wall to keep it looking fresh and vibrant. With a little creativity and attention to detail, you can create a stunning faux flower wall that adds a touch of beauty and elegance to any space.