
how to make triangle wedding arch?
To make a triangle wedding arch, you will need to gather the necessary materials such as wooden dowels, screws, drill, saw, sandpaper, and floral foam. First, cut the wooden dowels to the desired length and sand them down to smooth any rough edges. Then, drill holes in the dowels to connect them together using screws. Once the frame is assembled, attach floral foam to the base of the arch and cover it with greenery or flowers. You can also add additional decorations such as ribbons or lights to enhance the look of the arch. Finally, place the arch in the desired location and secure it to the ground using stakes or weights.
1、 Measure and Cut Wooden Dowels
How to make a triangle wedding arch? The first step is to measure and cut wooden dowels to the desired length. The length will depend on the size of the arch you want to create. Once you have the dowels cut, you can begin assembling the arch.
To assemble the arch, you will need to connect the dowels at the corners to create a triangle shape. You can use metal brackets or screws to secure the dowels together. Once the frame is assembled, you can decorate it with flowers, greenery, or fabric to create a beautiful wedding arch.
When choosing the wooden dowels, it is important to select a sturdy and durable wood that can support the weight of the decorations. Cedar, pine, and oak are popular choices for wedding arches.
Another important consideration is the location of the arch. If you plan to use the arch outdoors, you will need to secure it to the ground to prevent it from tipping over. You can use stakes or sandbags to anchor the arch in place.
Overall, making a triangle wedding arch is a fun and creative project that can add a beautiful touch to your wedding ceremony. With a little bit of planning and preparation, you can create a stunning arch that will be the perfect backdrop for your special day.
2、 Assemble the Triangle Frame
How to make a triangle wedding arch? The first step is to assemble the triangle frame. This can be done using wooden or metal poles, depending on your preference. Start by measuring and cutting the poles to the desired length, ensuring that they are all the same size. Then, connect the poles at the corners using metal brackets or screws. Make sure that the frame is sturdy and secure, as it will be supporting the weight of the decorations and any fabric or flowers that you add.
Once the frame is assembled, you can begin decorating it. This is where you can get creative and add your own personal touch. Some popular options include draping fabric over the frame, attaching flowers or greenery, or hanging lights or lanterns. You can also add personal touches such as photos or signs to make the arch more meaningful.
It's important to keep in mind the location and weather conditions when decorating your triangle wedding arch. If it will be outdoors, make sure that the decorations are secure and won't blow away in the wind. If it will be in direct sunlight, consider using materials that won't fade or wilt quickly.
Overall, making a triangle wedding arch can be a fun and rewarding DIY project. With a little creativity and some basic construction skills, you can create a beautiful and unique backdrop for your special day.
3、 Sand and Stain the Frame
How to make a triangle wedding arch:
1. Gather materials: You will need three wooden poles, a saw, sandpaper, wood stain, a paintbrush, and screws.
2. Cut the poles: Use a saw to cut the poles to the desired length. Make sure they are all the same length.
3. Sand the poles: Use sandpaper to smooth out any rough edges or splinters on the poles.
4. Stain the frame: Apply wood stain to the poles using a paintbrush. Allow the stain to dry completely before moving on to the next step.
5. Assemble the frame: Arrange the poles in a triangle shape and screw them together at the top. Make sure the frame is sturdy and secure.
6. Decorate the arch: Add flowers, greenery, or other decorations to the arch to match your wedding theme.
7. Set up the arch: Find a suitable location for the arch and secure it in place using stakes or weights.
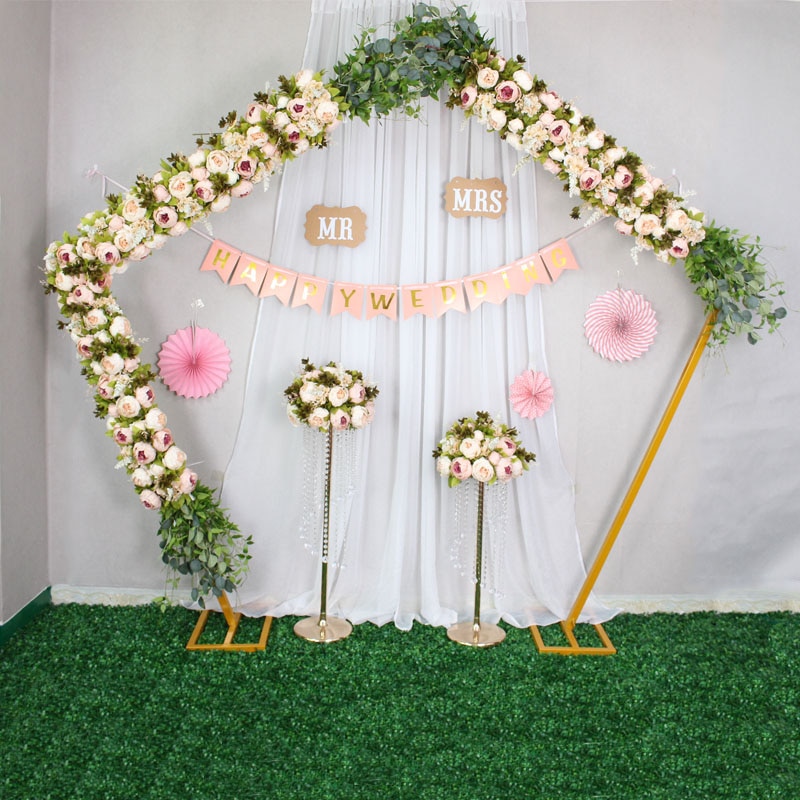
The triangle wedding arch is a popular choice for modern weddings. It provides a unique and stylish backdrop for the ceremony and can be easily customized to match any wedding theme. When making the arch, it is important to choose high-quality materials and ensure that the frame is sturdy and secure. Additionally, consider adding personal touches such as custom signage or lighting to make the arch truly unique. With a little creativity and effort, you can create a beautiful and memorable wedding arch that will be the centerpiece of your special day.
4、 Attach Floral Foam to the Frame
How to make a triangle wedding arch? One of the first steps is to attach floral foam to the frame. Floral foam is a crucial element in creating a beautiful and sturdy wedding arch. It provides a stable base for the flowers and greenery to be attached to, ensuring that they stay in place throughout the ceremony.
To attach the floral foam to the frame, you will need to use floral wire or zip ties. Start by soaking the foam in water for at least 30 minutes to ensure that it is fully hydrated. Then, place the foam onto the frame and secure it in place using the wire or zip ties. Make sure that the foam is tightly secured to the frame to prevent it from moving or falling off during the ceremony.
Once the foam is securely attached to the frame, you can begin adding your flowers and greenery. Start by inserting the stems of the flowers and greenery into the foam, making sure to cover the entire surface of the foam. You can use a variety of flowers and greenery to create a beautiful and unique wedding arch that matches your wedding theme and colors.
In recent years, there has been a trend towards using more sustainable and eco-friendly materials in wedding decor. Consider using biodegradable floral foam or alternative materials such as chicken wire or moss to create your wedding arch. These materials are not only better for the environment, but they can also add a unique and natural touch to your wedding decor.


