how to make your own wedding arch?
To make your own wedding arch, you will need to gather materials such as wooden or metal poles, floral wire, flowers, greenery, and any other decorative elements you desire. First, decide on the size and shape of your arch and cut the poles to the appropriate length. Then, secure the poles together using screws or brackets. Next, attach the floral wire to the arch and begin weaving in the greenery and flowers. You can use zip ties or floral tape to secure the flowers and greenery in place. Once you have achieved the desired look, add any additional decorative elements such as ribbons or lights. Finally, transport the arch to your wedding venue and secure it in place using stakes or sandbags.
1、 Choosing the Right Materials
How to Make Your Own Wedding Arch:
Making your own wedding arch can be a fun and rewarding DIY project that adds a personal touch to your special day. Here are some steps to follow:
1. Choose the Right Materials: The first step in making your own wedding arch is to choose the right materials. You can use a variety of materials such as wood, metal, bamboo, or even PVC pipes. Consider the style of your wedding and choose materials that complement it. For example, if you're having a rustic wedding, you may want to use natural wood or branches.
2. Decide on the Size and Shape: The next step is to decide on the size and shape of your wedding arch. Consider the space where you'll be setting it up and choose a size that fits the area. You can also choose from a variety of shapes such as circular, square, or even asymmetrical.
3. Gather Your Tools: Once you've chosen your materials and decided on the size and shape, it's time to gather your tools. You'll need a saw, drill, screws, and other tools depending on the materials you've chosen.
4. Build the Frame: The next step is to build the frame of your wedding arch. This involves cutting and assembling the pieces of wood or metal to create the shape you've chosen. Be sure to follow the instructions carefully and use the right tools to ensure a sturdy frame.
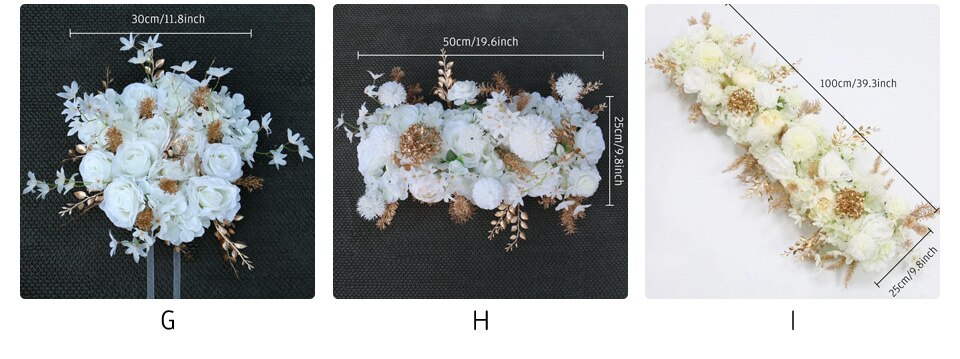
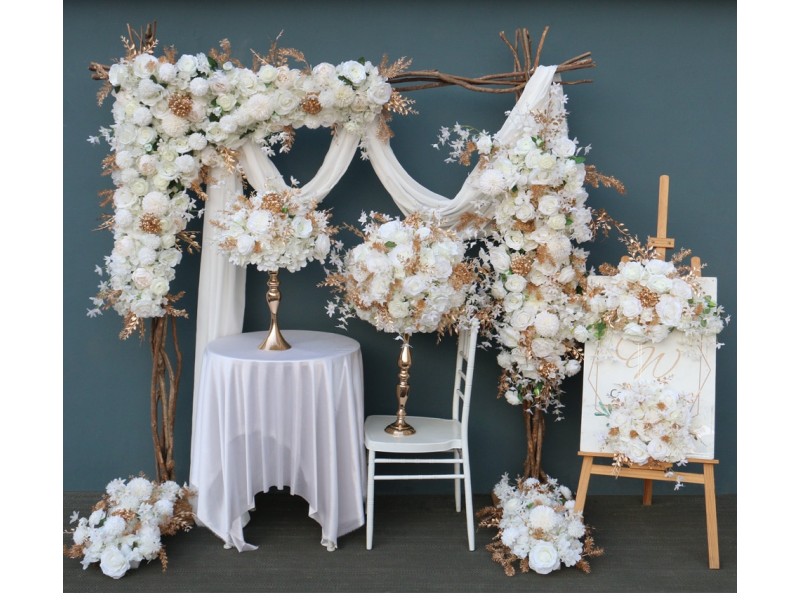
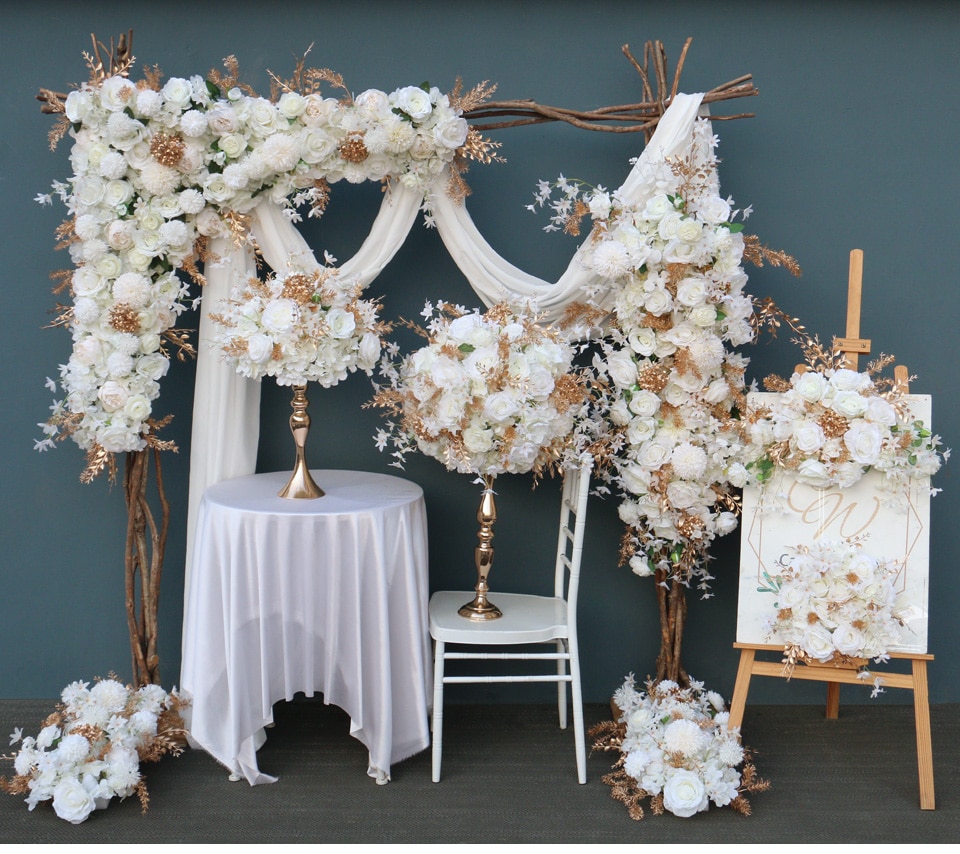
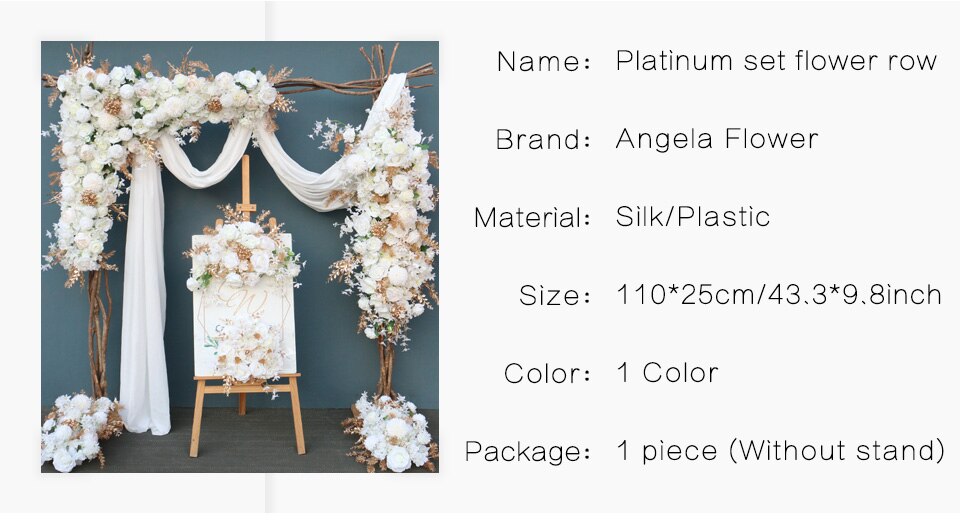
5. Decorate the Arch: Once you've built the frame, it's time to decorate your wedding arch. You can add flowers, greenery, ribbons, or other decorations that match your wedding theme. Be creative and have fun with it!
In conclusion, making your own wedding arch can be a fun and rewarding DIY project. By choosing the right materials, deciding on the size and shape, gathering your tools, building the frame, and decorating the arch, you can create a beautiful and personalized wedding arch that will be a memorable part of your special day.
2、 Designing the Arch
How to make your own wedding arch:
Designing the Arch:
Designing your own wedding arch can be a fun and creative process. First, consider the style and theme of your wedding. Do you want a rustic, bohemian look or a more modern and sleek design? Once you have a vision in mind, start gathering inspiration from wedding blogs, Pinterest, and other sources.
Next, choose your materials. Popular options include wood, bamboo, metal, and floral arrangements. If you're using wood or bamboo, you can either purchase pre-cut pieces or cut them yourself to the desired length. For a metal arch, you may need to hire a welder or purchase a pre-made frame.
Once you have your materials, it's time to assemble the arch. If you're using wood or bamboo, you can use screws or zip ties to secure the pieces together. For a metal arch, you may need to use welding equipment or bolts and nuts.
Finally, add your finishing touches. This could include draping fabric or greenery over the arch, adding flowers or other decorations, or even hanging lights for a romantic touch.
Remember, your wedding arch should reflect your personal style and the overall theme of your wedding. Don't be afraid to get creative and make it your own!
3、 Preparing the Site
How to Make Your Own Wedding Arch:
Preparing the Site:
Before you start building your wedding arch, it's important to prepare the site where it will be placed. Here are some steps to follow:
1. Choose the location: Decide where you want to place your wedding arch. It should be a prominent location that is easily visible to your guests.
2. Clear the area: Remove any obstacles or debris from the area where you will be placing the arch. This will ensure that the arch is stable and secure.
3. Measure the area: Measure the width and height of the area where you will be placing the arch. This will help you determine the size of the arch you need to build.
4. Level the ground: Use a level to ensure that the ground is level where you will be placing the arch. This will help ensure that the arch is stable and secure.
5. Consider the weather: If you are having an outdoor wedding, consider the weather conditions. If it's going to be windy, you may need to secure the arch with additional supports.
6. Decorate the area: Once you have prepared the site, you can start decorating the area around the arch. Consider adding flowers, greenery, or other decorations to create a beautiful backdrop for your wedding ceremony.
In today's world, many couples are opting for DIY wedding arches to add a personal touch to their special day. With a little bit of planning and preparation, you can create a beautiful wedding arch that will be the perfect backdrop for your ceremony.
4、 Building the Arch
How to make your own wedding arch:
Building the Arch:
A wedding arch is a beautiful addition to any outdoor wedding ceremony. It provides a focal point for the ceremony and can be decorated to match the wedding theme. Here are the steps to build your own wedding arch:
1. Choose the location: Decide where you want to place the wedding arch. Make sure it is a flat surface and can support the weight of the arch.
2. Choose the materials: You can use wood, metal, or PVC pipes to build the arch. Wood is the most popular choice as it is easy to work with and can be stained or painted to match the wedding theme.
3. Measure and cut the wood: Measure the height and width of the arch and cut the wood accordingly. Use a saw to cut the wood to the desired length.
4. Assemble the arch: Use screws or nails to attach the pieces of wood together. Make sure the arch is sturdy and can withstand wind and weather.
5. Decorate the arch: Once the arch is assembled, you can decorate it with flowers, ribbons, or fabric. Use zip ties or wire to attach the decorations to the arch.
6. Set up the arch: Transport the arch to the wedding location and set it up. Make sure it is level and secure.
7. Enjoy the ceremony: The wedding arch will provide a beautiful backdrop for the ceremony and will be a memorable part of the wedding day.
In recent years, there has been a trend towards more eco-friendly and sustainable wedding arches. Couples are using recycled materials such as old doors, windows, and pallets to create unique and rustic wedding arches. This not only adds a personal touch to the wedding but also reduces waste and promotes sustainability.